Table of Contents
Sage CRM Workflow Overview
How to Build a Sage CRM Workflow (Demonstration)
How to Create Multiple Actions Within a Single Sage CRM Workflow Rule
How to Add Security Rules to Show and Hide Workflow Buttons in Sage CRM
How to Create Simple Automatic Notifications in Sage CRM
Sage CRM Workflow Overview
Let’s be honest for a second:
When you own a business, there are quite a few days when you’re too tired or too stressed or too distracted to make sure you’re delivering a great customer experience. Those days happen for your employees too.
Guess who suffers then? Yep, your customers – the people who choose to spend their hard-earned money on your product or service instead of your competitor’s.
Luckily, Sage CRM can assist you in delivering an incredible customer experience by utilizing automation and workflows. This helps you ensure that your customers receive great service every time, all the time.
Keep Your Communications Timely with Automation
In today’s fast-paced business environment, it can be easy to forget about small follow-up tasks and procedures, such as sending an updated quote or maintaining contact with leads who have a delayed timeline.
These days we’ve all heard and said, “If I don’t write it down, I’ll forget about it,” but if we forget to write down those client concerns or tasks, it could mean the difference between keeping a customer and losing them.
With Sage CRM, you can stay on top of all your communications and tasks with ease, even if you forget to write down reminders for yourself. Not only is it simple for your business to set a standardized follow-through procedure for all leads, it’s also a breeze to set up alerts and triggered workflows to ensure no customer has to wait too long to get information or resolve an issue.
Coordinate Marketing and Sales with Workflows – Really!
Do the following scenarios sound familiar?
- The sales team complains because their promotions aren’t being marketed properly, or because they don’t have the materials they need to nurture prospects.
- The marketing team complains that the sales people don’t tell them what they need until it’s too late, or that the timing of promotions is inconvenient for the current communications schedule.
If you’re finding yourself nodding your head, it’s probably time for you to heal those interdepartmental relations.
Sage CRM helps your sales and marketing teams work together effectively by offering transparency into processes and procedures, as well as empowering your teams with the ability to coordinate their efforts using dual-department workflows.
In addition, Sage CRM enhances sales and marketing efforts by segmenting customers into appropriate audiences and then providing metrics that help prove ROI and drive productivity.
Increase Customer Experience by Saving Time
Think back to the last time one of your customer service reps answered the call of a curious customer with a seemingly simple question, such as the number of green widgets in their recent sales order.
Was your rep able to provide an immediate answer for the customer, or did he or she need to check with someone else who had access to the data? A delay like that is likely to irritate your customer, especially if they get off the phone and have to search through their own records to get the answer you should have had.
Not only can you avoid running into that problem again by integrating Sage CRM with your Sage ERP, you can also eliminate many other bottlenecks and delays in your customer interactions.
How?
Use Sage CRM to track the time it takes to address various types of customer queries and concerns. Because Sage CRM offers a comprehensive view of all your customer-related activities, you’ll see where delays occur in the process. When you eliminate those delays, you’ll increase customer satisfaction – and keep your customers returning to do business with you again and again.
A Word of Advice
“We believe that customer service shouldn’t be just a department; it should be the entire company.” –Tony Hsieh, Founders, Zappos.com
A legendary customer experience, like that from Zappos.com, is what can differentiate your company from the competition. Sure, everyone offers customer service, but they offer it because they’re supposed to. Don’t shortchange your customers, delight them.
Sage CRM Workflow Benefits
You will find many benefits of the Sage CRM Workflow Engine including:
- Reduce administrative errors
- Improve business process efficiencies
- Increase communication and collaboration
- Create high-quality, targeted marketing communications
- Track all interactions, including open rates, clicks, and bounces
- Measure campaign effectiveness and learn from past experience
- Standardize lead qualification and follow-up protocol
- Achieve consistency in prospect communication
- Automate the approval of quotes and discounts
- Automate and assign rule-based tasks
- Improve analysis of pipeline progress
Get the brochure here: Sage CRM Workflow Brochure
Return to Top
How to Build a Sage CRM Workflow (Demonstration)
In this demonstration, we’ll show you how to build a Sage CRM sales workflow and associated automations.
The goal is to build a relatively basic workflow, step-by-step, from beginning to end, and to demonstrate the basics of workflows, how they work, and what the purposes are of them.
Then we’ll drill down a little bit deeper into some of the more advanced topics like how to build conditional rules and triggers and automations
You can watch the entire workshop below:
Return to Top
How To Create Multiple Actions Within A Single Workflow Rule Using Sage CRM
Occasionally, certain business process requires multiple things to be triggered at once.
For example, a software company might have a 1-800 troubleshooting number that allows users to call in when they find a bug with the software. When the software support department takes a call they create a case in Sage CRM for the bug. Once the programming department is alerted, they jump into Sage CRM and set the case to ‘In Progress’ or a similar stage.
Let’s assume for our example that the ‘In Progress’ stage needs to accomplish the following actions:
- Record Any Notes About the Bug.
- Create a Task for the Programmer.
- Send an Email to the Programming Department Manager.
The following instructions will show you how to set up your system to perform these functions in a single workflow action.
Record Any Notes About the Bug.
- Select the case workflow since the Sage CRM cases entity handles customer service issues.
- Drill into Administration > Advanced Customization > Workflow > Case Workflow and click Edit Workflow. This will allow you to make changes to any action for this workflow.
- Click into the Investigating workflow rule. By default, Sage CRM already has the case_assigneduserid and case_stage added to the investigating workflow rule so our first action of recording any notes is already set up for us.
Create a Task for the Programmer.
Send an Email to the Programming Department Manager.
We will set up these two functions simultaneously.
- Click on the New button below the workflow actions section since our second item to accomplish is to create a task for the programmer.
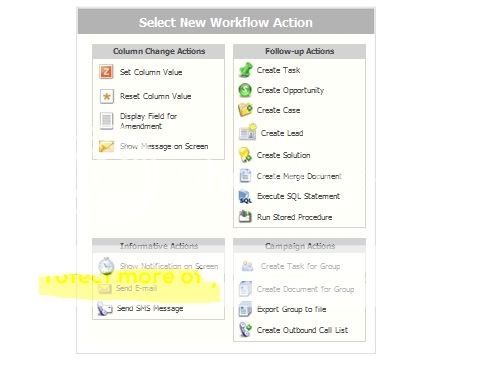
- Create another new action like the one above. This time, select New Email.
- We are then taken to the email form screen. Create your email form and put your case fields out into the email by selecting the fields from the Choose Field To Insert Into The Email dropdown just below the email body. Click save.
- We are taken back to the workflow action. Click save, then click Activate Workflow. We are now ready to test our multi-function workflow rule.
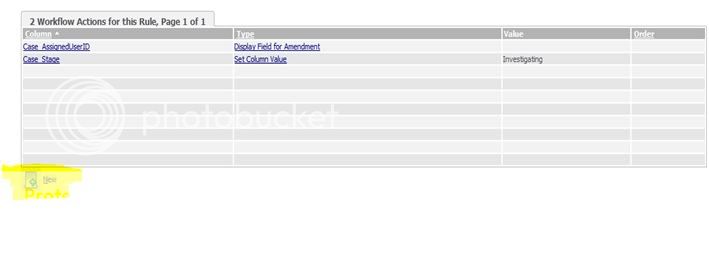
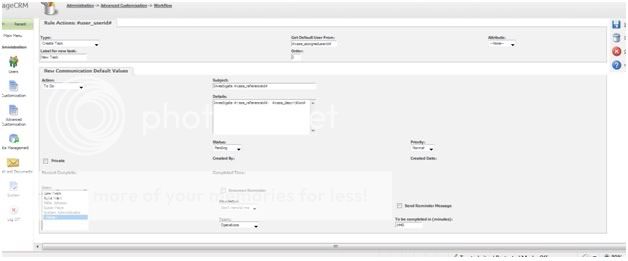
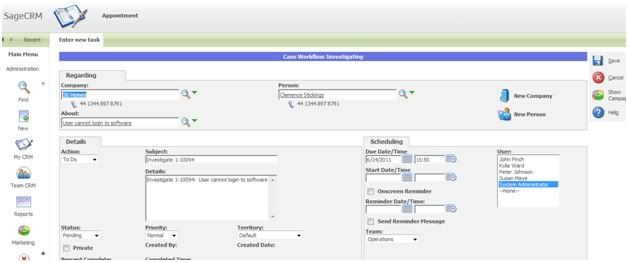
We will add some basic information to the subject and details for the tasks so that Sage CRM grabs the case-specific data. We will set the task to the assigned user for this case. If it is to go to the same user each time, you can select the user from the User Select near the bottom of that screen. Click save.
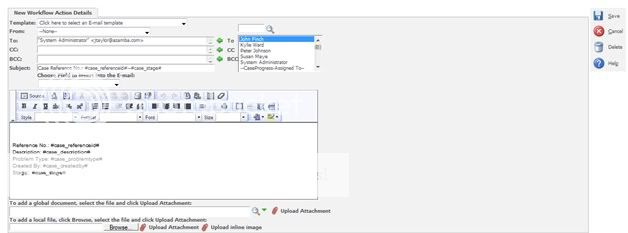
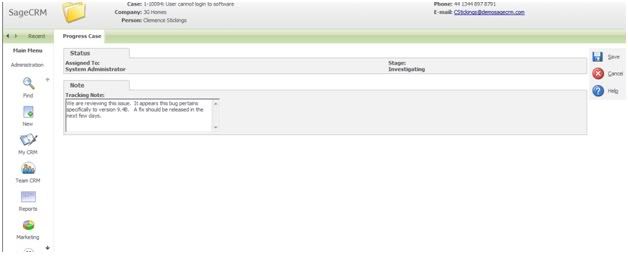
We created a case, then moved it through workflow until we reached the investigating workflow stage. As you can see, we can enter my notes for this stage. Once the notes are entered, we click save and am taken to the next step of this rule.
You can see that the next screen is a task creation screen. The details are auto-filled due to me inserting the case fields into the template (see above).
Once saved, you can see the task now shows up in the calendar tasks!

Lastly, since it was supposed to send an email, it does not take us to an email entry screen. We have already setup the email template and it now knows who should receive the email.
We can check the inbox and there’s the email with all of the details for this case. Bingo!

We have now completed a three step workflow rule from just one workflow action which allows us to document the notes in Sage CRM, create a task for the programmer and send an email to either a static or dynamic recipient.
Return to Top
Return to Top
How to Create Simple Automatic Notifications in Sage CRM
Automatic notifications are a very powerful tool when harnessed in Sage CRM.
Each notification should only take a few minutes to setup and they can keep salespeople and management aware of what’s moving through your sales pipeline. Sage currently only allows on-screen notifications and email notifications.
In this particular example, we’re going to show an on-screen notification in case email is not configured in your CRM instance.
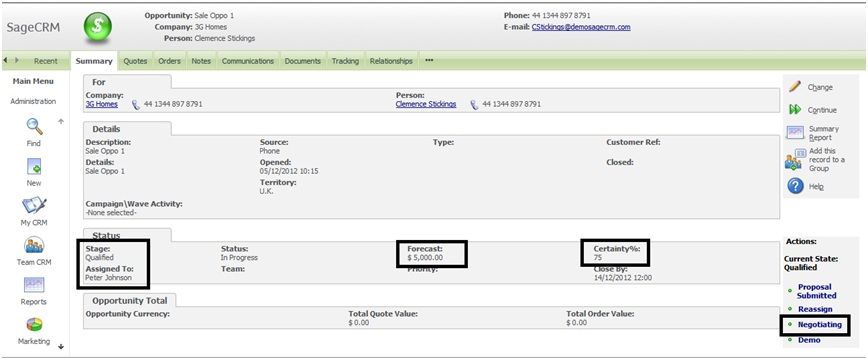
Let’s say your company wants to notify the account manager for a customer if an opportunity from one of your salespeople hits the following criteria:
- Forecast: $5000
- Certainty %: 75
- Stage: Negotiation
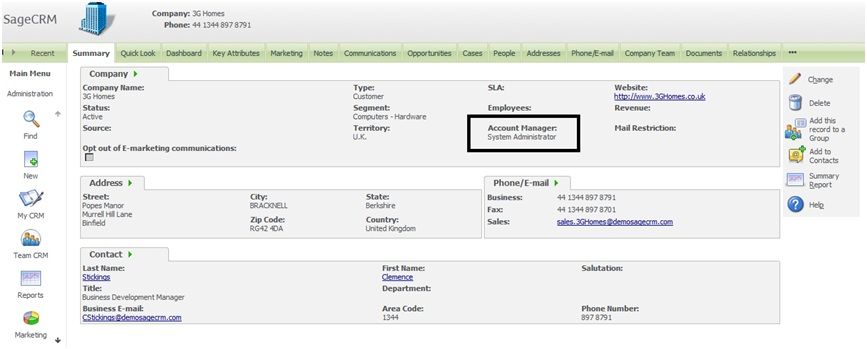
In screenshot #1 below, you can see that all of these criteria have been met. Peter Johnson is the one who is assigned to this opportunity, however, he is not actually the account manager of the customer. In this particular case, the System Administrator is the account manager for this company (see screenshot #2).
Screenshot #1
Screenshot #2
Now, follow the next few steps to get an on-screen notification setup (the steps are after my screenshot).
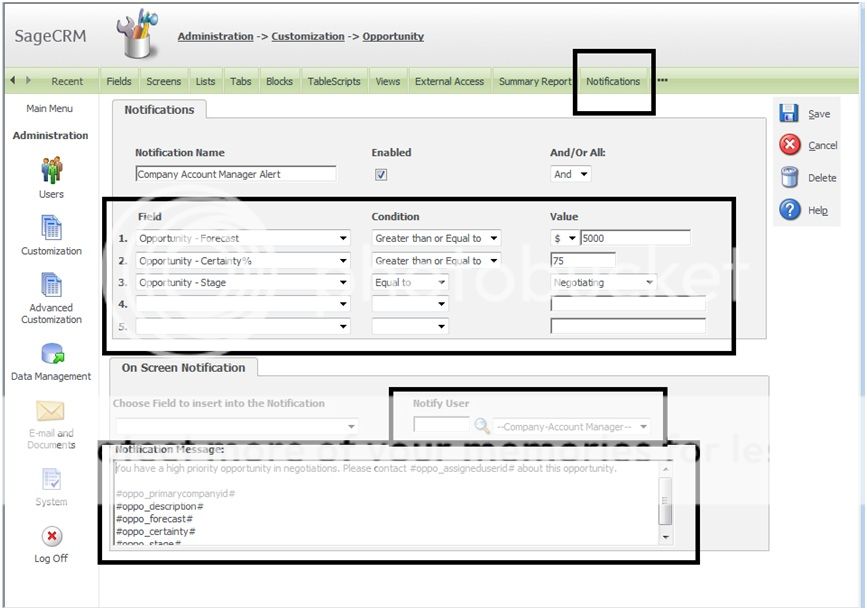
- Navigate to Administration -> Customization -> Opportunity -> Notifications (tab) > “New On Screen Notification”. This should take you to an entry screen where you can setup your notification conditions and notification message.
- Give the notification a “Notification Name” and make sure the notification is enabled. This is so you can identify this particular notification from others that you will create—there is no bearing on the actual notification itself.
- Create your conditions by adding each field, setting the condition, and the value that is needed to meet the condition. In my example, we’re creating 3 conditions—one for “Forecast,” one for “Certainty %” and one for “Stage” of the opportunity.
- Select which user you want to notify. You can notify a specific user by username, or you can make it more dynamic, like we are—we are going to notify the company account manager (in many cases this will be the same person as the opportunity “Assigned To” field). Please note: if you need to update more than one user for this particular rule, you must create a separate notification with the same criteria and change the “Notify User” field.
- Create your “Notification Message”. This is what you’ll see in the on-screen message. You can select any field available to you by choosing the field name from the “Choose Field to insert into the Notification” field—this will add the field to the on-screen message. As you can see in my example, I have added numerous fields to the message.
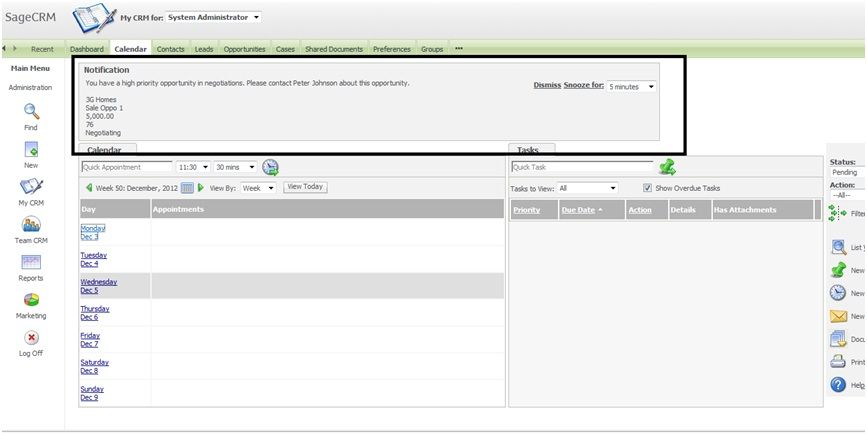
Now let’s test. I’ve set the stage to negotiating, the forecast is now $5000 and the certainty % is 76. See below.
Even if we navigate to another company/account while logged in as System Administrator (screenshot directly above), the on screen notification still appears—it’s a clear alert that the account manager needs to get involved with closing the sale.
Now start creating notifications for your own team and see how effective they can be! If you use email notifications in conjunction with on-screen notifications, you make Sage CRM even more robust.

